The Implications of Utility

Within the context of WoW, utility can be defined as beneficial spells or abilities that serve a special cause. Most of them fall under these major categories:

-crowd control (i.e. Leg Sweep)

-movement/positioning (i.e. Stampeding Roar or Gorefiend’s Grasp)

-interrupts (i.e. Solar Beam)

-raid survivability cooldowns (i.e. Smoke Bomb)

-cleansing/immunities (i.e. Mass Dispel, Divine Shield)

-irregular damage and healing (i.e. Heart of the Wild)

Most of the categories above should be pretty clear cut and simple. However, I want to make a special note about irregular damage and healing. I’m referring mostly to classes who aren’t normally responsible for healing or dealing damage. For example, an Elemental Shaman putting down Healing Rain on the raid would be considered irregular and utility, whereas a Restoration Shaman putting down Healing Rain would not. Thus, Elemental Shamans, who are normally responsible for dealing damage, can be considered to have the utility and the option to assist in healing. This ties in a bit with my post about Raid Role Conversions if you want to read further about that concept.

Take note that DPS cooldowns are not considered utility. There are no points in a fight where using DPS cooldowns (properly) would yield a negative impact, barring special encounter mechanics. However, having the option of manipulating your DPS a certain way for special fights may be considered utility.

Why use utility?

So what is utility good for, anyway? Well, assuming the content you are working on is non-trivial, the DPS/Healing checks should be tight. Utility should be – well – utilized to improve your raid. Sometimes, the benefit you gain isn’t very obvious. You have to view the benefit of utility from an effective standpoint. What does interrupting effectively do? This part is best understood with specific examples.

Scenario: Horridon add phase

The Dinomancer begins channeling a heal on Horridon. Spending resources to interrupt does lower your personal DPS, but that energy/runic power/rage you just spent interrupting just did a massive amount of effective damage because you prevented Horridon from being healed an extra tick.

Scenario: Council of Elders

Sul is chain casting Sand Bolts. Because Sand Bolts are an AoE of 5-yards, that interrupt can end up being a very large amount of effective healing, and often a very worthwhile trade.

Knowing what utility does

Because there are more categories and abilities within than can be feasibly explained, I hope to go over the concept and idea so the implications can be derived by yourself.

  1. Why use it?
  2. What does it actually do?
  3. Evaluate the outcome.

You must first consider the necessity of the ability, and why you’re using it. There has to be a reason you use utility, otherwise in most cases it will either go to waste or have a negative impact on the raid. As such, utility should always be used in response to something. If your tank is struggling on surviving against stunnable adds, or healers are struggling with mana, then consider using an AoE stun.

Second, you must know what the ability effectively does. An AoE stun effectively makes the tank immune to damage from adds for the stun duration. If the adds were otherwise doing 100k DPS on the tank, then your 5 second AoE stun just did 500k healing (or rather, prevented 500k damage). There are other implications too, like preventing them from moving, which may be positive or negative.

Third, re-evaluate if the ability was worthwhile. You may have helped the tank survive by using an AoE stun, but at the cost of extra damage. The bit of survivability help he needed could have come from elsewhere, like an external cooldown that would’ve allowed him to still receive Vengeance. If all better alternatives have been exhausted, then you can say the AoE stun was beneficial. Usually, the best way to determine if something works for your group is just trial and error. Try all options a couple of times and it should be apparent which one is better.

Further examples

While it isn’t feasible for me to go over every category and each example, I would like to mention a few types that I often see underutilized.

Immunities/extreme damage reduction cooldowns:

There are often encounter mechanics that involve applying an otherwise irremovable debuff that can be immuned. Frostbite on Council of Elders for example is one. On heroic, dealing with Frostbite is a major part of the fight. Being able to immune them gives your healers a huge relief, as healing through 300k/second for 30 seconds is not a trivial amount. Similarly, there are often a couple of bosses that do an ability where the raid needs to split the damage. In the last tier, Blade Lord Tayak’s Unseen Strike can be solo-soaked by several classes. Due to the nature of the ability, it poses a huge risk to your raid due to Wind Step ticks. Having players soak it alone not only reduces the amount your raid needs to heal, but also eliminates the risk of people dying. In this tier, solo soaking Static Shock on Lei Shen, especially during transition phases can be very helpful.

Movement/positioning abilities:

Stampeding Roar is a very under-used ability. People often only remember to use it when there’s a specific ability that it’d be perfect for. However, if you’re able to hit multiple people with it during any movement part of the fight, it’s extremely worth it. While the roar may be a personal performance loss, the fact that it’s a pure performance gain for every other person you hit negates that. Most people remember to use it for bosses like Ji-kun, Lei Shen, Durumu, but there’s a very good use for it on every fight, you just have to remember that the utility does translate to an effective performance increase. Similarly, Leap of Faith and Demonic Gateway should also be used on every fight. After trying a new fight a few times, it should be pretty easy to find ways to use these movement skills to your advantage.

Dispels:

There are almost always abilities in every tier that involve a dispellable stun going out on the raid that the healer is responsible for dispelling. In this tier, Twin Consorts’ Slumber Spores is a 5 second sleep. Let’s forget about the 75k/second for 5 seconds the slumber spores does, and focus on the damage/healing loss from the sleep. Giving healers a (very conservative) 2 second reaction/GCD buffer time, said players should not lose too much damage and healing. However, in practice (I’m guilty of this too), debuffs tend to last much longer than that. The effective DPS or, more severely, HPS loss is incredibly high. Consider a hunter sustaining 120k DPS. The extra three seconds he spent in sleep just cost you 360k damage. A healer doing 80k HPS losing three seconds is 240k healing. This might not seem like a lot, but this is just one GCD. Assuming a 1.5s GCD, dispelling a DPS worth 240k DPS for that global and 160k HPS for that global. The utility of dispelling quickly translates to a massive amount of damage/healing loss prevention.

Also not specifically categorized as a dispel, there are unorthodox ways to dispel debuffs that you normally can’t. Almost all negative effects are categorized as either being physical or magical, regardless of what type of debuff it is (Magic, Curse, Disease, etc.) Most physical effects are removed by Hand of Protection. Magical debuffs are removed by AMS, Cloak of Shadows. Divine Shield and Iceblock can remove both. Control impairing effects are removed by abilities like Unbound Will. Movement impairing effects are removed by Stampeding Roar, Hand of Freedom, and Windwalk Totem.

Summary

Using utility abilities to your advantage can improve your raid a vast amount. The amount of abilities Blizzard has put into the game for you to counter boss abilities with is endless. Be it dispels for debuffs, immunities for dangerous abilities, speed boosts, or simple as interrupts. Knowing which to use in what situations is an important factor in ensuring your raid is at its full potential.

I hope this post will help you in your raiding ventures. Until next time!
Raid Role Conversion – Fundamentals

Raid role conversion is the process of having certain roles help with responsibilities normally delegated to other roles. Even though healers’ normal job is to heal and ensure the raid survives, they still have ways to do DPS. Similarly, damage dealers are regularly there to – well – do DPS, but have ways of either healing or increasing survivability. Occasionally, it may be beneficial for your healers to help with DPS, or vice versa. This is a form of optimization, and when used correctly, should yield an improvement on your raid’s overall performance. It is very important to note that, as one might expect, healers are the best at healing, and damage dealers are the best at DPS. Thus, if you have your raid members stepping out of their role too often, or have two-way conversions, it will have a negative impact on your raid.

So when can you use this conversion? Well, have you ever hit a certain phase of a fight and realized that the damage going out on the raid is just too much to handle? The first response most people have is to save cooldowns for it, but what if cooldowns are still not enough? Conversely, I’m sure many raiders have encountered not meeting a tight DPS requirement on a boss’ Berserk. A typical response would be to drop a healer for another DPS, but what if you don’t have that option? Not everyone wants to simply succumb to the DPS check and wait for more gear. There has to be another way!

Each fight has its own healing and DPS checks. Note: Healing, in the context of this article is inclusive of both healing and survivability. Take Jin’rokh for example. There’s barely any healing to do in the normal phase, to the extent where one healer suffices. However, come Lightning Storm, the healing check is quickly raised to require two, maybe even three healers. Should your raid bring two healers and be strained on Storm healing, or bring three and have massive periods of healing downtime outside Storm? This is where raid role conversion comes in. Instead of bringing three healers, bring two and have the raid help compensate that bit of extra healing required. Pretend that you are converting damage dealers into healers for Storm to make up the amount lacking.

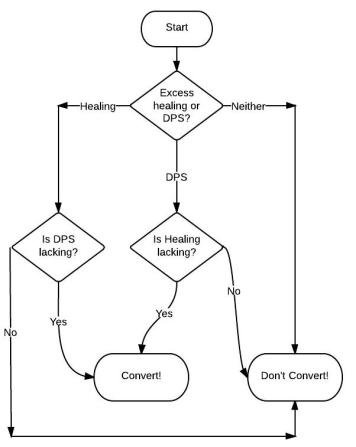
I must stress here that it’s very important to only convert when one side is in excess and the other is lacking. For example, you may run into the situation where you’re barely meeting the healing check but aren’t meeting the DPS check. In this case, one side is even and the other is lacking. Converting healing into DPS wouldn’t help you here, as your healing is not in excess. Furthermore, if neither side is lacking, then you should stay away from conversions, and let each role do what they are good at. Excess healing can be stored in form of mana for emergency situations. Excess DPS kills the boss faster, and gives you less time for things to go wrong.

The concept may be easier to understand in the form of an analogy. Imagine that you’re the principal of an understaffed middle school. You have 5 English teachers (healers) and 5 Math teachers (DPS). The amount of classes in session concurrently represents the healing and DPS checks.

Day 1

You have 7 English and 3 Math classes that need teachers. Is it better to have two English classes go without teachers while two Math teachers have nothing to do, or, however sub-optimally, have the Math teachers teach English?

Day 2

There are 5 English and 6 Math classes. Does it really make sense to have one of the English teachers teach the 6th math class?

Here’s a quick flowchart to further clarify:

RaidRoleConversionFlowchartCropped

Ultimately, it’s better to not implement conversion if you’re ever uncertain if it’s a benefit. In a future post, I’ll discuss the viable ways you can have said conversions, who excels at it, and the practicality of such conversions in the current tier.

Tanking Horridon

So when my guild came upon Horridon, second boss of Throne of Thunder, something interesting happened. We read up the fight, saw kill videos, but when it came to executing the fight, we just fell apart. This happened first on normal, then again on Heroic. We’ve since killed him, and after a while I deciphered why this fight was so uniquely difficult for us.

 Tank:

Tanking is a very important aspect of raiding. If your tank can’t generate threat, your DPS can’t do damage. If your tank doesn’t pick up mobs, your healers can’t heal properly. As far as add fights like Horridon goes, the situation is best put into a little list of the priorities for the tanks:

  1. Pick up the adds
  2. Corral the adds.
  3. Do not move them unnecessarily.

The tank’s first job is to make sure mobs don’t hit healers or DPS. Second, they have to make sure the adds are in a position where dps can do their job properly. For example, a Death Knight could hold threat on 3 mobs that are spread out via diseases ticking, but that doesn’t actually help DPS that require them to be stacked, like Monks, Elemental Shamans, Hunters, etc. Sure, tab dotters can damage those just fine, but unless you have no one in your raid that requires clustered mobs, that’s probably not okay. Lastly, consider how certain classes AoE. Destruction Warlocks put down Rin of Fre, Monkins Hrricane, etc. If you’re just moving the adds everywhere while you pick up more, they can’t use those abilities. Also consider fire on the ground. Melee may not be able to move through the fire with you, and will lose globals if they can’t keep up.

So what happened in our case? Since the tanks weren’t able to corral the adds after picking them up, the DPS couldn’t AoE/multi-target properly. The DPS sees that nothing is clumped, so they begin single targeting. Because the tank is using AoE abilities to pick up adds, and probably not able to commit too much damage to individual targets. Once DPS start single targeting one target rather than distributing their damage (and thus their threat) throughout targets, they start pulling aggro. Most tanks’ first reaction when they see their threat plates turn colour is to instinctively taunt it back. Now taunt is down for 8 seconds and more adds are rushing out of the door. Since the tank no longer has taunt, he has to walk over there to pick up the adds, further dragging everything along. The vicious cycle may repeat again, where another single mob gets pulled. The outcome is that not only did DPS/healers get hit unnecessarily (which we’ll put aside for now), but that the adds were never in a position to be AoE’ed.

Knowing that Dinomancers are the first priority, people probably dropped everything to go kill it, rather than being able to cleave it down in the clump. Interrupters either have to give up an interrupt target (which is okay sometimes), or give up damaging the Dinomancer. In the former case, stuns, fireballs, and venom bolt volleys may go out. In the latter, there may be an extra set of adds that spawns because you failed to kill the Dinomancer fast enough for the gate to be destroyed.

By giving up overall damage, you’ll begin to be overwhelmed. The worst thing to happen on Horridon is to be overwhelmed. Every door has mobs that don’t do much alone, but in numbers are incredibly powerful. It’s mostly the little adds from Drakkari door. When everyone in your raid has a little add beating on them, the disease stacks go up faster than you can cleanse. Depending on your composition, you may not even have the luxury of cleansing the raid, since the tank is also overwhelmed by the disease + mortal strike. Things get out of hand quickly from there. The big adds living longer means more fire: Sand traps, Living Poisons, Frozen Orbs,and Lightning Totems. While it is possible for you to be so overwhelmed that you run out of places to stand in the arena, it’s much more likely that you’ll be dead from incidental ticks, or inability to move freely to dodge other abilities.

This situation is best handled via communication. Establish beforehand what mobs you’re going to pick up and how. For example, on each of the doors, the adds that come out of the gate are much less dangerous than the ones that jump into the arena. In a perfect world, a tank would be able to pick up and hold everything, keep them corralled, not stand in fire, and not have unnecessary movement. However, since nobody plays perfectly, alternative solutions have to be explored.

Consider that the gate adds don’t melee for much. It’s okay for them to be on healers/DPS for a short time. If you are ahead on damage, it is acceptable to move extra amounts or not have adds corralled all the time. What if an add spawned 30 yards away and you have no taunt/ranged abilities to grab it? Depending on what the add is, you may be forced to drag adds with you to pick up the new one, or you may be able to just wait a few seconds for taunt to come back up. This could be further improved by planning your taunts.

What I often observe is a tank expending taunt and threat abilities without planning. A mob lands next to him, he taunts and proceeds to build threat. Did he really need to taunt? Couldn’t he have just hit it once? What if two adds spawn like that? If he taunts the one next to him, the other one is now most likely running loose. Same could be said when someone pulls off the tank, and they taunt back. The tank could just as well hit it once and grab threat back, and save taunt for something more important.

A decision also has to be made in terms of how important it is for you to pick up an add. Generally, the only adds that are absolutely imperative to pick up are just the ones that hit hard. There are other factors like interrupts and kill priority, but the tank isn’t always needed for those. Picking up a mob doesn’t necessarily mean to drag all your mobs to it. You compare the loose add to the adds you picked up previously, and decide which one is more important to pick up. Maybe it’s better to let one of the Bloodlords run loose, just to make sure you will be able to pick up the Venom Priests that spawn right after.

Admittedly, the above isn’t a very graceful or elegant way of handling everything, since in the ideal scenario, you’re never put in that situation. However, there are still ways you can do the fight cleanly without perfect execution from the tank. This involves lots of planning and communication.

 Raid:

Tanking and threat doesn’t have to solely be the responsibility of the tank. There are many things individual players, and even the raid as a whole can do to help, like utility abilities (which include Threat, Reposition, CC), and positioning as a whole.

Imagine the scenario that your raid is now 20 wipes into Horridon, and you seem to always fall apart on the double spawn Frozen Warlords on the Drakkari door. You’re able to pick up one, but the other is just out of your reach. This is where the raid comes in. There are so many abilities between 10 people, just at your disposal. Consider that the Frozen Warlord is completely immune to all forms of CC (I’ll have to verify). You could have someone taunt it to you (Monks, Paladins), have someone redirect threat (Hunters, Rogues), or have whoever it is targeting use a threat drop (Fade, Vanish, Hand of Salvation). Alternatively, you could also utilize the raid’s positioning to your advantage.

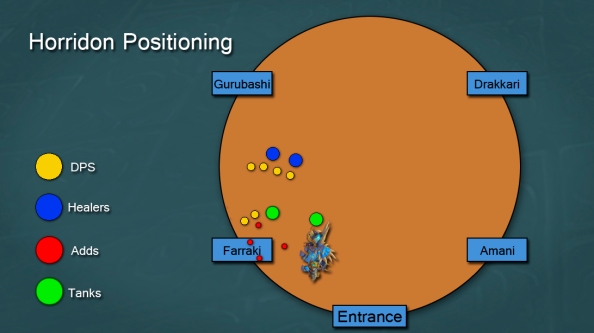
Horridon-diagram

This may look like a pretty standard way of positioning everything, but notice where the healers are relative to the tanks, and the spawn point. The idea is to always place the tanks between where the adds spawn and where the healers are, so regardless of whether the tank actively tries to pick up the add, the add itself always has to run through the tank. The ranged DPS can float anywhere they want, but they have to keep in mind that some ground AoE can only be placed on ranged, and thus they don’t have to hinder melee. The healers’ position should always be as far towards where you’re headed, which on this fight means they should be further clockwise along the circle than everyone else. They will still need to position such that they can reach both tanks. Also worth mentioning is that this style of positioning is applicable to a lot of bosses. You may not be positioned exactly the same way, but just keep in mind that healers are most often the ones to have initial threat on adds, and position tanks accordingly.

DPS:

The tanking problem can have a lot to do with DPS as well. Reckless or selfish DPS will often make your tanks dislike you. Remember that personal damage and overall raid damage are two different things. Each individual person doing their own maximum damage might yield worse results than if everyone played raid-centric.

The prime example, which I’m guilty of, is dotting up adds right as they spawn. As a moonkin, getting all my dots up as soon as I can means more damage for me. However, this means that the initial threat the tank needs to do to pick up an add is now however damage I did, instead of the miniscule amount of threat the healers had. The result is that adds are now bouncing between tanks and DPS, they are never corralled for AoE, which doesn’t actually affect me as a moonkin. In the end, I get to do my maximum DPS, but in turn the raid loses DPS as a whole.

The proper way to approach this is to use as many utility abilities as possible to make sure that I can deal a reasonable amount of damage while making sure the tank is able to pick up adds. This could mean using threat drops, or slows/stun/knockbacks to make sure the tank can regain threat. Remember though, the worst thing you can do is to run away from the tank with an add chasing you. If there are no other options, simply pop a defensive cooldown and walk next to the tank while he picks it back up.

A separate point that is most applicable to DPS on this fight is orb management. Horridon doesn’t actually break the gate until you finish the channel on the orb. If the DPS delays picking up the orb by, say, 10 seconds in favour of doing more damage, there might be another set of adds! No one does enough damage on this fight to warrant extra add spawns. Let us compare two dps:

-Bob, who picks up the orb right away regardless of the situation

-Joe, who decides to continue DPS’ing, and picks up the orb 10 seconds later

On the meters, you’ll see that Bob does less dps than Joe. However, because Bob picked up the orb right away, he prevented two adds from spawning, effectively doing the adds’ health combined in the 10 seconds that Joe decided to continue DPS’ing. The amount of damage Bob prevented the raid from having to do is far beyond what anyone could’ve done in those 10 seconds of not clicking the orb. More adds also means more strain on the tanks. Moral of the story: don’t be Joe.

 Healer:

Healers are often considered to have the easiest job, since regardless of fight mechanics, they really just have to keep the raid alive. However, it’s important for the healers to point out and for the raid to ask how much can they handle. Like mentioned above, the tank may opt to forfeit picking up some of less dangerous mobs in favour of managing the more dangerous ones cleaner. In this case, like the healers have to assess whether or not the damage hitting non-tanks is too severe, and notify the raid. For example, the Amani Protectors on the 4th door really don’t hit hard, or do anything at all. It just takes a couple of HoTs to keep their target alive, whereas the Amani Warbears are a completely different story. The DPS and tanks need to know what’s okay and what isn’t.

Lastly, the healers and tanks need to constantly discuss how much damage they are taking. There are few cases where the tank takes so much damage on an add fight that they need to play super defensively all the time. On Horridon, tanks can afford to sacrifice survivability in favour of better add pick up. For example, Brewmaster Monks can spam SCK, sometimes even in favour of Keg Smash to pick up adds. The pulsing nature of SCK allows them to pick up adds that are spread out while maintaining threat on their current targets. However, while spamming SCK, you do not gain Elusive Brew charges, and thus lose some survivability. The healers may need to spend more mana, or even cooldowns, but in return the adds die faster, and healers will have more time to regen between doors.

 Conclusion

Every raid will eventually work out their own version of the strategy. There’s not one place you can go that tells you exactly what every person needs to do. Try the fight, figure out where your strengths and weakness are. Adjust, communicate, and utilize every aspect of your raid to ensure that you help your tank as much as you can, as they are the key to defeating Horridon successfully.